Shop Model Trees
 Shop Model Bushes
 Shop Model Grass
Primo Models - Step by Step Guide
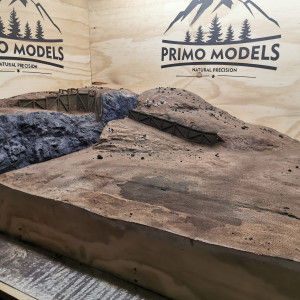
Welcome everybody who decided to use their time and read our “Primo Models Layout- Basic Terrain (step2)” article. This time our goal will be to cover the baseboard with the first layer of soil/sand to make sure we will not have any white patches sticking out later on during the work. Furthermore, we will work on the wooden retaining walls already at this point because we want to avoid cutting, shaping, or patching land later on during the project.
Needed Materials:
Plank Maker – Link how to make one
https://primomodels.co.uk/plank-maker/
Balsa Sheet- 2mm thick
Pine Strip – 4x4mm
Metal Sheet – 0.25mm
Metal Sheet – 0.4mm
Paints – Brown, black, green
Weathering Powders – Rust/Dirt/Sand/Mud
Sanding paper – 120+
Superglue
Paintbrushes
Airbrush (optional)
Basic Terrain and Retaing Walls- Step By Step
Step 1
The first step to creating basic terrain is to smooth out the entire surface of our layout; if possible, try to take your project outside as this step usually creates a big mess. I suggest to start with sandpaper granulation of 120 and go higher up to 240 in spots where you are planning to have roads, paths, or other places without vegetation.

Step 2
Before cleaning after step 1, it will be worth to spend some time on curving and shaping the “smoothing mass” that we used to connect our rock molds on the future river and waterfall. There is no specific tips or directions that I could share here. Just make sure that there are no “unnatural” looking, or rounded “drops” of filler hanging around after drying off. If you are not sure of the quality of your “rock carving,” you may want to paint it over with gray color. That will allow you to see better the shapes and cracks you are making.

Step 3
After you sand down the surface and clean it up with vacuum cleaner and wet paper, it is time to paint it with desired ground color (in our case, brown). Make sure that you cover all of the white spots. Any paint type will be good at this point. For the rocks base color, I have used Basalt Grey from Vallejo collection (details about rock painting will come with river and waterfall tutorial).


Step 4
Now its right time to shape/cut out whatever you need and finalize the basic terrain before placing the first layer of soil/sand. In our case, we had to work on the roadside slopes and shape them a bit for easier wall support installation.

Step 5a
Creating retaining walls is one of the main features in this tutorial; for that reason, I will add a few sub-steps. First of all, we have to prepare planks and supporting beams for the retaining walls. I have used “Plank Maker” that I have made earlier on (Find how to make on here: xx) and strip cutter (How to tutorial coming soon). Planks will be 4mm/2mm and 6cm long (17cm/35cm/5m in reality). Beams are 4mm/4mm and different lengths (35/35cm real size).

Step 5b
Once we have enough planks and beams cut, we have to paint them. I do not have any specific recipes for mixing colors because this will be only the initial paint layer; I am just trying to soak and darken the balsa wood in this step. I would advise not to go too dark at this point. It is straightforward to make our planks darker but hard to achieve the reversed process. Let the wood soak in your mixture for a couple of minutes.

Step 5c
When the wood is pre-soaked, its time to dry our planks and beams. Take away the paint and softly swipe each plank and beam with a paper towel. That will bring out the woodgrain out and created the realistic old wood look. You can control the final shade of your planks by adjusting the pressure you are placing on a paper towel while swiping off fresh paint. Leave the wood to dry for 10-20 minutes before continuing with the next step.


Step 5d
Placing the retaining wall is pretty straightforward. Firstly, place your upright beams in the desired position. Use one of your planks to measure the distance required between beams. Make sure to leave space for neighboring plank on the back of the beam. When they are ready, glue all of the planks behind them with the help of superglue. Finally, we can cut and place the top horizontal beams and diagonal plank support beams.

Step 5e
Now when the construction is ready, we can patch holes and unwanted empty spaces behind the retaining wall. Here again, I use the “sculptamold” mass for the job. When the filler is dry, we have to paint all patched surfaces. Last but not least, by using different paints and powders, we can weather the retaining wall and give the wood final look.


Step 5f
To add more realism to the retaining wall, I have cut some joining metal plates from 0.25mm thick brass sheet of 3mm width and 1,5cm length. Afterward, by using a 0.4 mm metal sheet, I cut the smallest strips I could, which later on I cut into “square-like” bolts imitation. Furthermore, I made a few corners joining plates and glued pins onto the plates. Lastly, I painted everything black, and using Vallejo rust powders weathered the plates and attached them to the retaining wall.


Step 6
Finally, we can place the first layer of dirt on our layout. Firstly, we have to cover the ground with glue. Before spreading the sand/soil trough the stocking place, randomly some stones in forest/wild areas if appropriate. I have added extra sand to the roads and the bottom of the retaining walls to make sure the first plank of the wall is covered with a soil layer. When we are satisfied with the look, we have to secure the sand in place by spraying first isopropyl alcohol for better glue absorption and 3:1 water-glue mixture.

Step 7
Last but not least, when sprayed glue is dry, we can start with painting the sand. The main idea here is to create different shades of the ground to create a more natural look. The layout I am working on will be mostly forest, so I painted everything with dark brown.

I hope that you have enjoyed this short and simple tutorial on how to make basic terrain. As always, I would like you to leave some comments/feedback so I can improve on writing articles and answer all untouched possible questions. The next tutorial will be about “Painting Rocks and creating the bridge.”
Join Primo Family at:
www.facebook.com/primomodelsuk
www.instagram.com/primomodelsin
Watch Video Tutorial: