Shop Model Trees
 Shop Model Bushes
 Shop Model Grass
Primo Models - Step by Step Guide
First of all, I would love to welcome everybody in the first episode of our “Primo Models Layout – Step by Step Guide” series. This time we will be building model railway baseboard. I am neither a good writer or a good camera operator. However, I have still decided to do my best and try to make both, write articles, and recorded videos from building our display layout for Primo Models. The tutorial is being done mostly for adapts to this fascinating hobby. However, I do hope that some of the experienced modellers will also find something new and exciting for them.
Not wasting any more time, let’s talk about how to build a model railway baseboard, which is the main topic of part one tutorial. First of all, there are tens, if not hundreds of different ways of creating the baseboard, and I will be presenting only one of them which suits my needs best. Model railway baseboards may be different in both methods of construction and materials used. People use different types of wood, metals, and plastics for the frame and anything from folded paper trough cardboard “skeletons”, metal meshes, expending windows foams, styrofoams, and others for the terrain.
With such a varied collection of choices, some people may get confused and stuck thinking of what is the best solution for their layout base. I would say that any method is suitable as long as you like it! Furthermore, instead of talking about each of the methods, I would instead focus on what are the most critical factors influencing the choice of the baseboard.


DURABILITY – No matter if you are planning to travel with your layout or keep it in the room most of the time, it should be built in the way to secure maximum strength and stability of the frame. It is also crucial for the material to be moisture resistance to avoid bending, varnishing can help here.
WEIGHT- This would be mostly for people who plan to travel with layout, but sometimes we have to move the layout within the room as well.
*JOINTS QUALITY- Most of the bigger size layouts are build from multiple baseboard parts. Creating smooth, reliable, long-lasting, and as less visible as a possible connection is the key to the final layout look.
*TERRAFORMING EASSIENESS- Whatever material you use to create a landscape of your layout should be easy to work. Some of the baseboard building techniques prevent changing the shape of the land once it is designed, or at least it makes it hard to adjust. For beginner modellers, I would suggest using Styrofoam. It adds weight but gives the flexibility of changing the mind and is the easiest and fastest to work with, in my opinion.
*THE ELASTICITY OF THE COVERING LAYER – No matter what construction method you choose to use, all of them end with the same step, which is covering the terrain with “smoothing mass.” No matter what kind of “gypsum” like mass you use, it is essential that it is as light as possible and has some level of elasticity. That will prevent the mass breaking while moving your module/layout.


Needed Materials:
Now, before I start to explain step by step process here is a concise and simple list of materials that we will need for this project:
List of required items:
1.Plywood Sheet – in this case 19mm
2.Drill
3.Wood Screws
4.Styrofoam Sheet
5.Styrofoam Glue
6. Jigsaw
7. Smoothing Mass – Sculptamold in this case
8. Few Clamps
Building Model Railway Baseboard - Step By Step
Step 1
Firstly, we, of course, have to decide on what we want to build. At this stage, it is enough to know the primary dimensions like length width and height. With this information, we can select the type and the ammount of materials we need to build our project. I have decided to use 18mm plywood. For my convenience I have used local BnQ cutting service and got:
3x Short Side (78cm/40cm)
2x Long Side (110cm/40cm)
2x Support panels (74,4/7cm)
Afterward, I have picked a styrofoam sheet (1.2m/2.4m/100mm), a few screws, glue, and I was ready to go home and start with another step.
Step 2
First of all, drill a bunch of the screw holes on the vertical side of shorter wooden boards in around 0.9cm from the edge. Make sure to make enough space for your screw heads to hide within the plywood sheet.
Put all of the pieces into a box with long sides being placed between shorter sides and two support panels in 1/3 and 2/3 of the module length as on the picture. If you do not have enough clamps, you may go corner by corner. It is crucial to align the sides and create a straight angle between them properly. At this stage, place only 2 of the bottom screws and the one on the top.

Step 3
Once your “box” is ready and steady, draw on the interior part the line around it that will be your cutting line and will create the final “edge landscape shape.” At this stage, we will need our third shorter board that we have bought. We have to clamp it together with the shorter panels on our model railway baseboard that will be directly connected to the next module. Once the third board is secure starting from the top, cut into the board, holding jigsaw on the outside walls and directing it while looking at the blade inside following the line.

Step 4
Before you take the clumps off and take off the third wooden board that will become the connecting side of the next module, make sure to drill at least three holes. The holes will make sure that your connection line between modules is smooth, durable, and accurate.

Step 5
Now its time to fix the “terrain”. We have to cut out the rectangle piece from the Styrofoam sheet that will fit into your baseboard frame. After installing it nicely to the frame, turn around the frame and draw lines on the styrofoam sheet along with the supporting panels. Now take it off and cut the space for the support panels in the way that will allow the sheet to sink into the frame as deep as you feel is required. Usually, I try to have it at least 1cm more in-depth than the lowest point on the layout, in this case, the river bed.

Step 6
Add and glue in more of the styrofoam pieces. How, where, and how many of them you place depends on what final shape you desire. The only tip here would be to keep the Styrofoam above the edges and cut the edge shape holding the saw/knife blade on the wooden frame edge.

Step 7
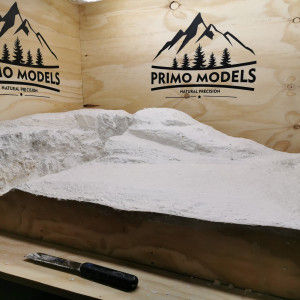
When you are satisfied with your initial “land-shape,” Its time to cover it with a thin layer of smoothing mass like Sculptamold mass, which I mix in 1/3 water-mass ratio. As I mentioned earlier in the article, it is essential that it is as light as possible and has some level of elasticity. That will prevent the mass breaking while moving your module/layout. As a tip, I would not recommend most of the plasterboard filler masses as they tend to be heavy and break off easily.

Step 8
Before you leave the model railway baseboard for drying, take some water on your fingers and smoothen the mass in the areas like roads, railways, paths, buildings, parking lots etc. Do not spend too much time worrying if you included all of the features that you wanted. It will not take too much work to fix or change some parts later during the layout construction. Now leave the layout to dry for 24h.

I hope you have enjoyed this short article describing the process of creating a model railway baseboard. If you have read this article and enjoyed it, please make sure to leave the comment. Most of all, I would love to hear from you on what “smoothing mass” do you use on your layout. If there are enough suggestions, we can make a small test and see how they present themselves side by side. Last but not least, I will do my best to include more photos and youtube video for Part 2!
Join Primo Family at: