Shop Model Trees
 Shop Model Bushes
 Shop Model Grass
Balsa Sheet Plank Maker
Hello, and welcome everybody in our second Primo Guide episode. This time I wanted to show you one of many ways to create a lot of relatively straight wooden planks from the balsa sheet. This small tool may turn very useful a specially if you need a significant amount of planks like we do when building the sawmill.
Plank Maker - List of Materials
Before listing the materials, I would like to underline that the first time I had to build the device, I use a regular utility knife blade. They have turned out to be too thick, and I could not get straight planks.
TOP TIP
The thinner and sharper blade, the better the plank quality!
- Plywood sheet (I have used 18mm)
- Handsaw (instead of jigsaw)
- Utility Knife
- Super Glue
- Tape
- Blade (Ideally scalpel)
- Balsa sheet (I used 1mm, 2mm, 4mm to build three different plank makers)

Plank Maker - Step By Step
Step 1
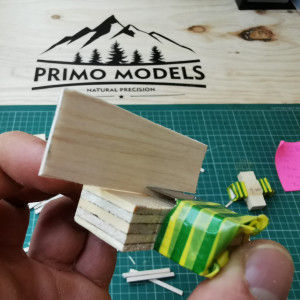
First of all, we need to draw the base for our tool on the plywood sheet. The size doesn’t matter, and it more depends on personal preferences. I have made it square 6x6cm with 2×2 cm small squares cut off in each corner, creating a cross. Next time I will make it a rectangle 12x6cm to secure the better guidance of the balsa sheet while cutting.

Step 2
Once we have our base ready, we need to cut the balsa sheet of the desired size. I have decided to make three different plank sizes (1:87): 1mm(9cm), 2mm (17cm), 4mm (34cm) width planks. Use super glue and place the cut piece on two of four arms of the device. Make sure to leave the space of the full width of another crossing arm like on the picture.

Step 3
Now we have to place and glue our blades. As I mentioned at the very beginning, the thinner the blade, the better the quality of the planks we will receive. I have used scalpel blades, which I luckily had in my toolbox, however looking later on the internet I have found a lot of better-suited blades for this job.

Step 4
Tape two out of four arms that you used to glue your balsa supports and blade. It will help to hold the edge firmly and prevent you from cutting your fingers while holding the tool.

Step 5
Now cut the balsa sheet to the desired length and use the plank maker to give them the desired width. I have used 5.7 cm long pieces, which would imitate 5m long wood planks in reality.

I hope you have enjoyed the guide, and you will find a use for this simple tool while working on your projects. Please share your opinion with us by leaving a comment! We would love to see pictures of your “plank maker.”
Watch Youtube Video for the tutorial:
Join us on:
https://www.facebook.com/Primomodelsuk
Follow us at: