Shop Model Trees
 Shop Model Bushes
 Shop Model Grass
Primo Models - Step by Step Guide
Hello, this will be the third part of our series titled Primo Models Layout- Part 3 How to make a wooden bridge” article. This time we will focus on building the bridge that will be standing on an earlier prepared mud road leading into the forest. The bridge is based on some pictures I have found on the internet and my imagination. Some of the dimensions and solutions used maybe not “architectonically” correct. I did my best, however, to try and do it as realistic as I could without spending days into the bridge designing. Furthermore, I will also not be mentioning different part lengths as they can be adjusted to your required bridge size needs.
Needed Materials:
Plank Maker – Link how to make one
https://primomodels.co.uk/plank-maker/
-Wood strip cutting tool
-Knife
-Small chisel
-Super Glue
-0.5mm balsa sheet
-6x6mm wooden strips
-3x5mm wooden strips
-4x4mm wooden strips
-Thin metal sheet (0.3-0.4mm?)
-Staples
-Paints/powders+brush
Wooden Bridge- Step By Step
Step 1
First of all, we have to prepare the materials that we will use for bridge construction. I have cut: six main vertical bridge beams from 6x6mm pine strip, two main horizontal beams from 4x4mm pine stripe, two top horizontal beams form 3x5mm pine stripe, column supports from 3x5mm pine wood and the rest of bridge construction from 4x4mm pine wood. Furthermore, I have cut the planks for bridge platform from 0.5mm balsa sheet using a 4mm width plank maker and railings elements using the same 0.5 balsa sheet but using 0.5mm plank mak this time.

Step 2
Once we have enough planks and beams cut, we have to paint them. The same as with retaining walls in the previous part, I do not have any specific recipes for mixing colors because this will be only the initial paint layer; I am just trying to soak and darken the balsa wood in this step. I would advise not to go too dark at this point. It is straightforward to make our planks darker but hard to achieve the reversed process. Let the wood soak in your mixture for a couple of minutes.

Step 3
Now its time to place our main vertical beams on the river bed. I have placed three of them on each side of the river. After I set the spread of pillars, by using horizontal main beams, I have equaled the horizontal beams hight. When it is all fixed, glue the beams together as on the picture.

Step 4
The next step will be to place platform support beams. Before doing that, however, we will need to measure the spread between main bridge beams and by using chisel create small indentations on the platform supporting beams so they can “sink onto” main beams. When they are ready, glue them to the main construction in an equal spread.

Step 5
Now we can safely install supporting beams as on the picture. All beams for this stage are made from 3x5mm pine wood. Each of the exact plank lengths is measured and cut individually after trying and marking the fit.

Step 6
Now the bridge is ready to be removed from the tiny and uncomfortable to work with space. Firstly, we want to install top platform supports along the bottom one this time using 3x5mm wood instead of 4x4mm. The diagonal supports connecting main vertical and horizontal beams are made using 4x4mm pieces and individually cut to fit. The bridge is now ready to lay its top planks. The planks are 0.5x4mm made by using “Plank Maker”.


Step 7
Last but not least, we can install our railings. They are all made from 0.5×0.5mm balsa wood and carefully glued in the way shown on the picture.


Step 8
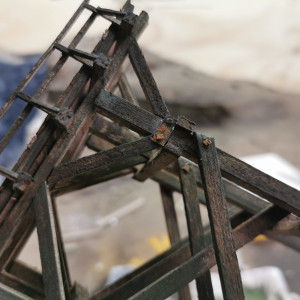
Similarly, as with retaining walls in the previous tutorial, we want to add realism by making connecting plates and bolts. I have cut some joining metal plates from a 0.25mm thick brass sheet of 3mm width and 1 cm length. Afterward, I cut staples into small square pieces, which will make nice bolts imitation. Lastly, I painted everything black and using Vallejo rust powders weathered the plates and bolts.


Step 9
By using Vallejo Mud and Dirt powders and greenwash, I have weathered the entire bridge and glued the plates and bolts on the top. Now the bridge is ready to be placed back to where it belongs.


As usual, I hope you have enjoyed reading the tutorial and will help you with building your projects. Please do not hesitate to leave any questions in the comments. You can be sure I will respond to them. The next tutorial will be about “Painting Rocks”
Join Primo Family at:
www.facebook.com/primomodelsuk
www.instagram.com/primomodelsin
Watch Video Tutorial: